Gutenberg Quick Start: from 0 to Hello, World
Gutenberg is a fantastic static site generator. It is likely the fastest generator in existence, it's got an easy-to-use yet powerful templating syntax, and it supports advanced features like syntax highlighting and Sass compilation out of the box.
This quick start guide will give you everything you need to know to build a custom static site, with your own templates, and taking advantage of all of Gutenberg's powerful features. At each stage, you'll be able to see demo sites that show exactly what a site like the one I've described looks like, and you'll be able to see the exact code that generated that demo site—it's all on GitHub, and there'll be links at every step.
In this first part, we'll start with creating a simple, single-page site. It won't be much, but it will give us a firm foundation to build on.
Installation and initialization
The first step, of course, is to install Gutenberg by following the Installation instructions in its documentation.
Once you've installed it, you'll have access to three new terminal commands:
gutenberg build, which will build output HTML and other static files for your
website, gutenberg serve, which will create a test server with live reload
(we'll use that a lot when testing our site), and gutenberg init, which
starts a new site.
Lets use this last command now. Navigate to the parent folder that you would
like to contain your Gutenberg site (in my case, went to ~/projects). Then
we need to pick out a name for our site; we'll be using demo in this example.
Run gutenberg init demo. Gutenberg will ask you a few questions. If you
have a domain name already picked out, feel free to provide it—but that won't
matter until we deploy our site much later. Answer n to all the other
questions (we'll return to these more advanced features soon).
When you've finished, you should have a new folder. Navigate to that folder, and you'll see a directory that looks like this:
  demo/
  ├── config.toml
  ├── content
  ├── static
  ├── templates
  └── themes
Now, run gutenberg serve and you'll get your first site. Navigate to the
URL, and you'll see it live! (Admittedly, it's not—yet—all that impressive).
If everything has gone according to plan, you should see something like this (with this and all other screenshots, click for a live version).
[](https://v01--gutenberg-simple-demo.netlify.com/)Our first template
As you can see, we just got a placeholder template. However, it tells us what
we need to do: make an index.html template.
So, navigate to the demo/templates folder and create a index.html file. in
that file, type the following code:
{{ section.content }}
What does that do? Well, Gutenberg uses the Tera templating language, which has basically the same syntax as Jinja2, Liquid, and Twig templating languages. If you don't know any of those languages, don't worry—we'll cover all the essentials in due course.
For now, it's enough to know that surrounding words in {{}} lets you access
variables defined outside your template. Specifically, {{ section.content }}
tells Tera to go to the current section and get the content of that
section.
So, what is the content of our section? Well, we have to make it. To do that,
navigate to the demo/content folder and create a new file called _index.md.
Type the following code into that file:
+++
title = "Gutenberg demo site"
+++
Hello, world
What is up with the first bit, inside the +++? Well, it's the
"front-matter"—basically a way for you to include meta-data about a page or
section without actually including the data in the section itself.
OK, now we have an index.html template, and an _index.md content page.
Lets run our server command and see what we get. If you're following along,
you should get something like this (again, click for the live site):
And your code, minimal though it is, should look like the code in this branch. Well, sort of, anyway: your code won't have the LICENSE or README files, since those are there to explain the demo project; but your project will have a couple of empty folders—one quirk of git is that it typically ignores empty folders).
Fixing our content
So, was that what you expected? We got our content, "Hello, world", but we
also got something else, the printed <p> HTML tags that surround it. Why
did that happen? It happened because Gutenberg is protecting us—whenever we
pass it HTML content, it will automatically sanatize the HTML. That is,
Gutenberg will automatically prevent the HTML from rendering as HTML, and
will instead replace it with encoded characters that present the HTML as plain
text. This is a nice default for a templating language to have (to prevent
cross-site scripting
attacks), but not really relevant to building a static site where we control
all of our content. So, how do we turn it off?
Pretty easily, as it turns out. What we need to do is edit our index.html
template to change {{ section.content }} to {{ section.content | safe }}.
This is our first filter, a command after a | that tells Gutenberg to
process the provided text differently. In this case safe tells Gutenberg
not to sanitize the text.
After that change, we get a site that looks like this (click for live site):
[](https://v03--gutenberg-simple-demo.netlify.com/)Adding some formatting
We've made it! A (very) basic webpage saying "Hello, world". But lets see if we can make it at least a little prettier; lets add a tiny bit of CSS and Markdown formatting.
First, the CSS. Lets open up our template and add seven lines of CSS. And,
while we're at it, lets add in enough HTML to generate an (almost) valid
page. Change the templates/index.html page to have the following content:
<!DOCTYPE html>
<html lang="en">
  <head>
    <meta charset="UTF-8">
    <style>
      body {
        margin: 40px auto;
        max-width: 650px;
        line-height: 1.6;
        font-size: 18px;
        color: #444;
        padding: 0 10px
      }
      h1,h2,h3 {
        line-height: 1.2;
      }
    </style>
  </head>

  <body>
    {{ section.content | safe }}
  </body>
</html>
Now, open up the content/_index.md file and add it some Markdown-formatted
text. You can use all of the
Markdown syntax, and
you can add any text you want. Here's what I added:
+++
title = "Gutenberg demo site"
+++
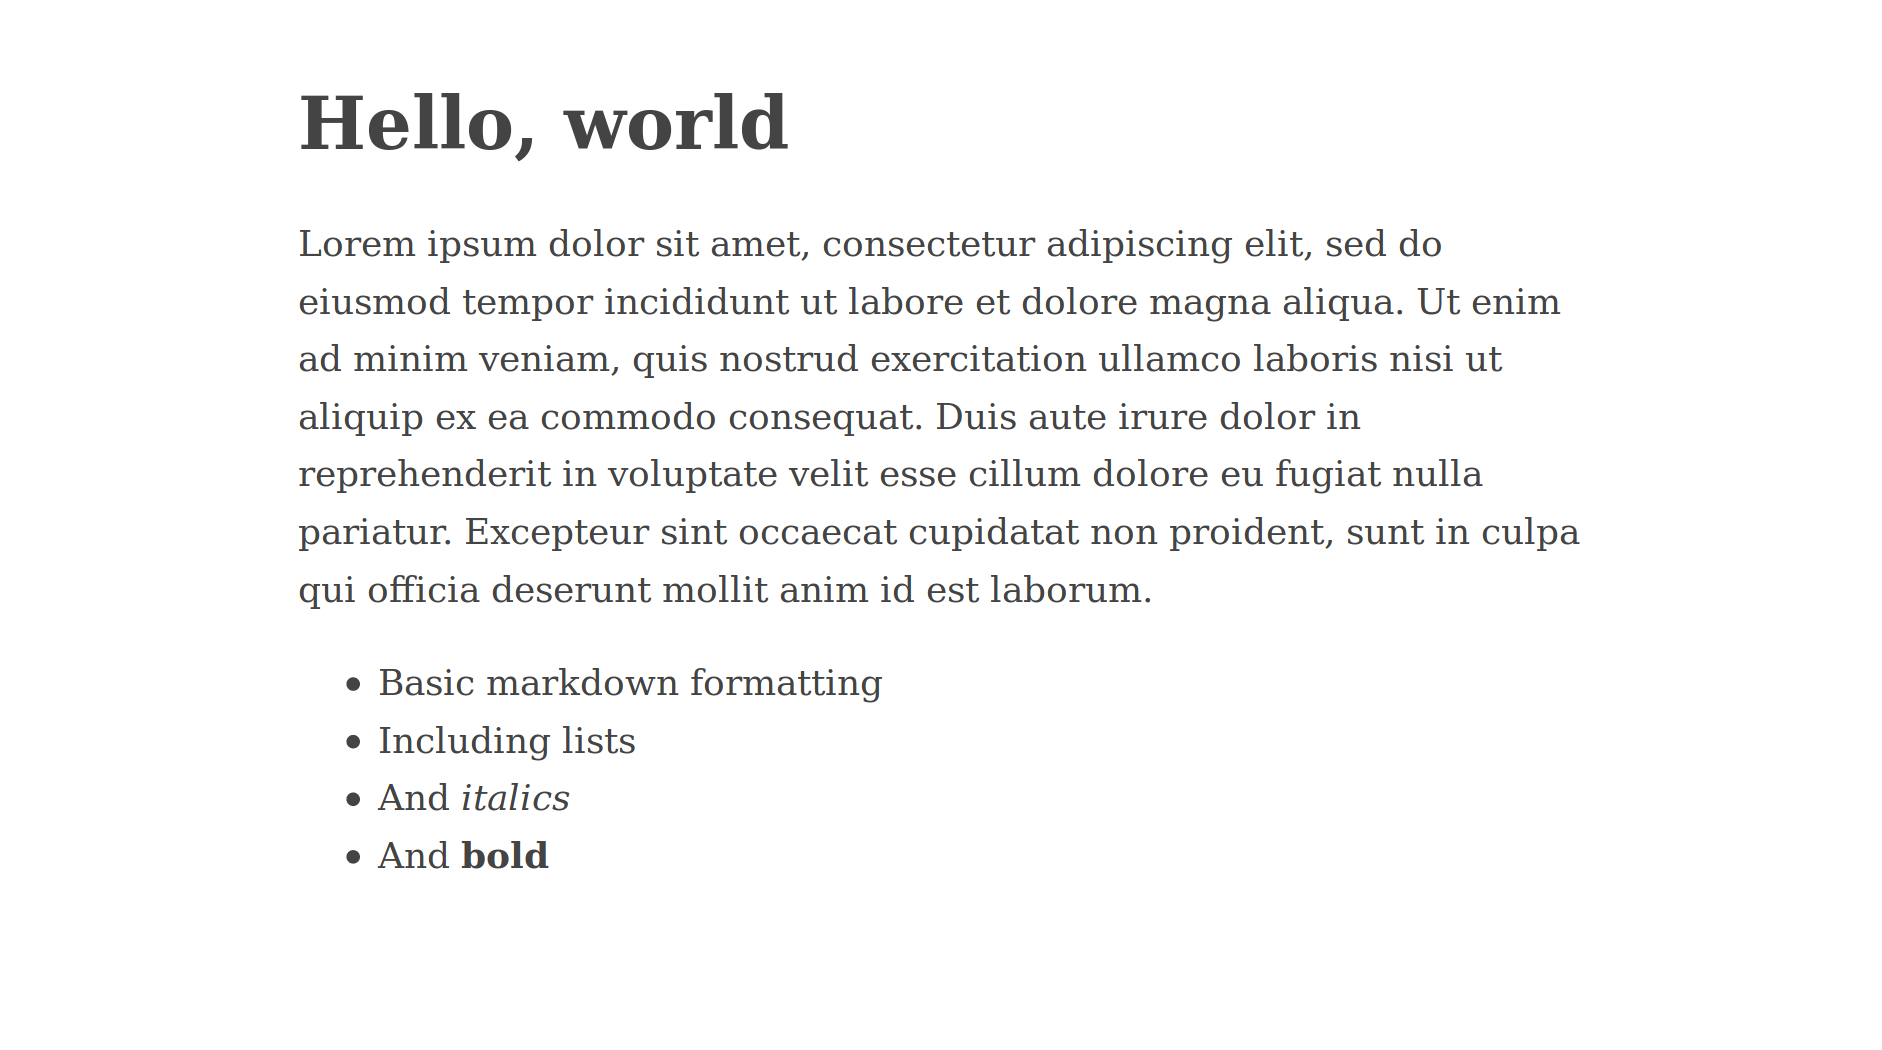
# Hello, world
Lorem ipsum dolor sit amet, consectetur adipiscing elit, sed do eiusmod tempor
incididunt ut labore et dolore magna aliqua. Ut enim ad minim veniam, quis
nostrud exercitation ullamco laboris nisi ut aliquip ex ea commodo consequat.
Duis aute irure dolor in reprehenderit in voluptate velit esse cillum dolore
eu fugiat nulla pariatur. Excepteur sint occaecat cupidatat non proident, sunt
in culpa qui officia deserunt mollit anim id est laborum
* Basic markdown formatting
* Including lists
* And _italics_
* And **bold**
With those two changes, we're starting to get something that at least resembles an actual website:
[](https://v04--gutenberg-simple-demo.netlify.com/)As always, click for the live site, and visit the relevant branch of the GitHub repo for the code.
Final touches
We need to make two additional changes before we can declare our "Hello, world"
site done. First, we need to add a title to our page, which is required to
have a valid HTML5 document. This should be old-hat by now: just open up the
index.html template and add in the title tag. When you're done, it should
look like this:
<!DOCTYPE html>
<html lang="en">
  <head>
    <title>Gutenberg Demo</title>
    <meta charset="UTF-8">
    <style>
      body {
        margin: 40px auto;
        max-width: 650px;
        line-height: 1.6;
        font-size: 18px;
        color: #444;
        padding: 0 10px
      }
      h1,h2,h3 {
        line-height: 1.2;
      }
    </style>
  </head>

  <body>
    {{ section.content | safe }}
  </body>
</html>
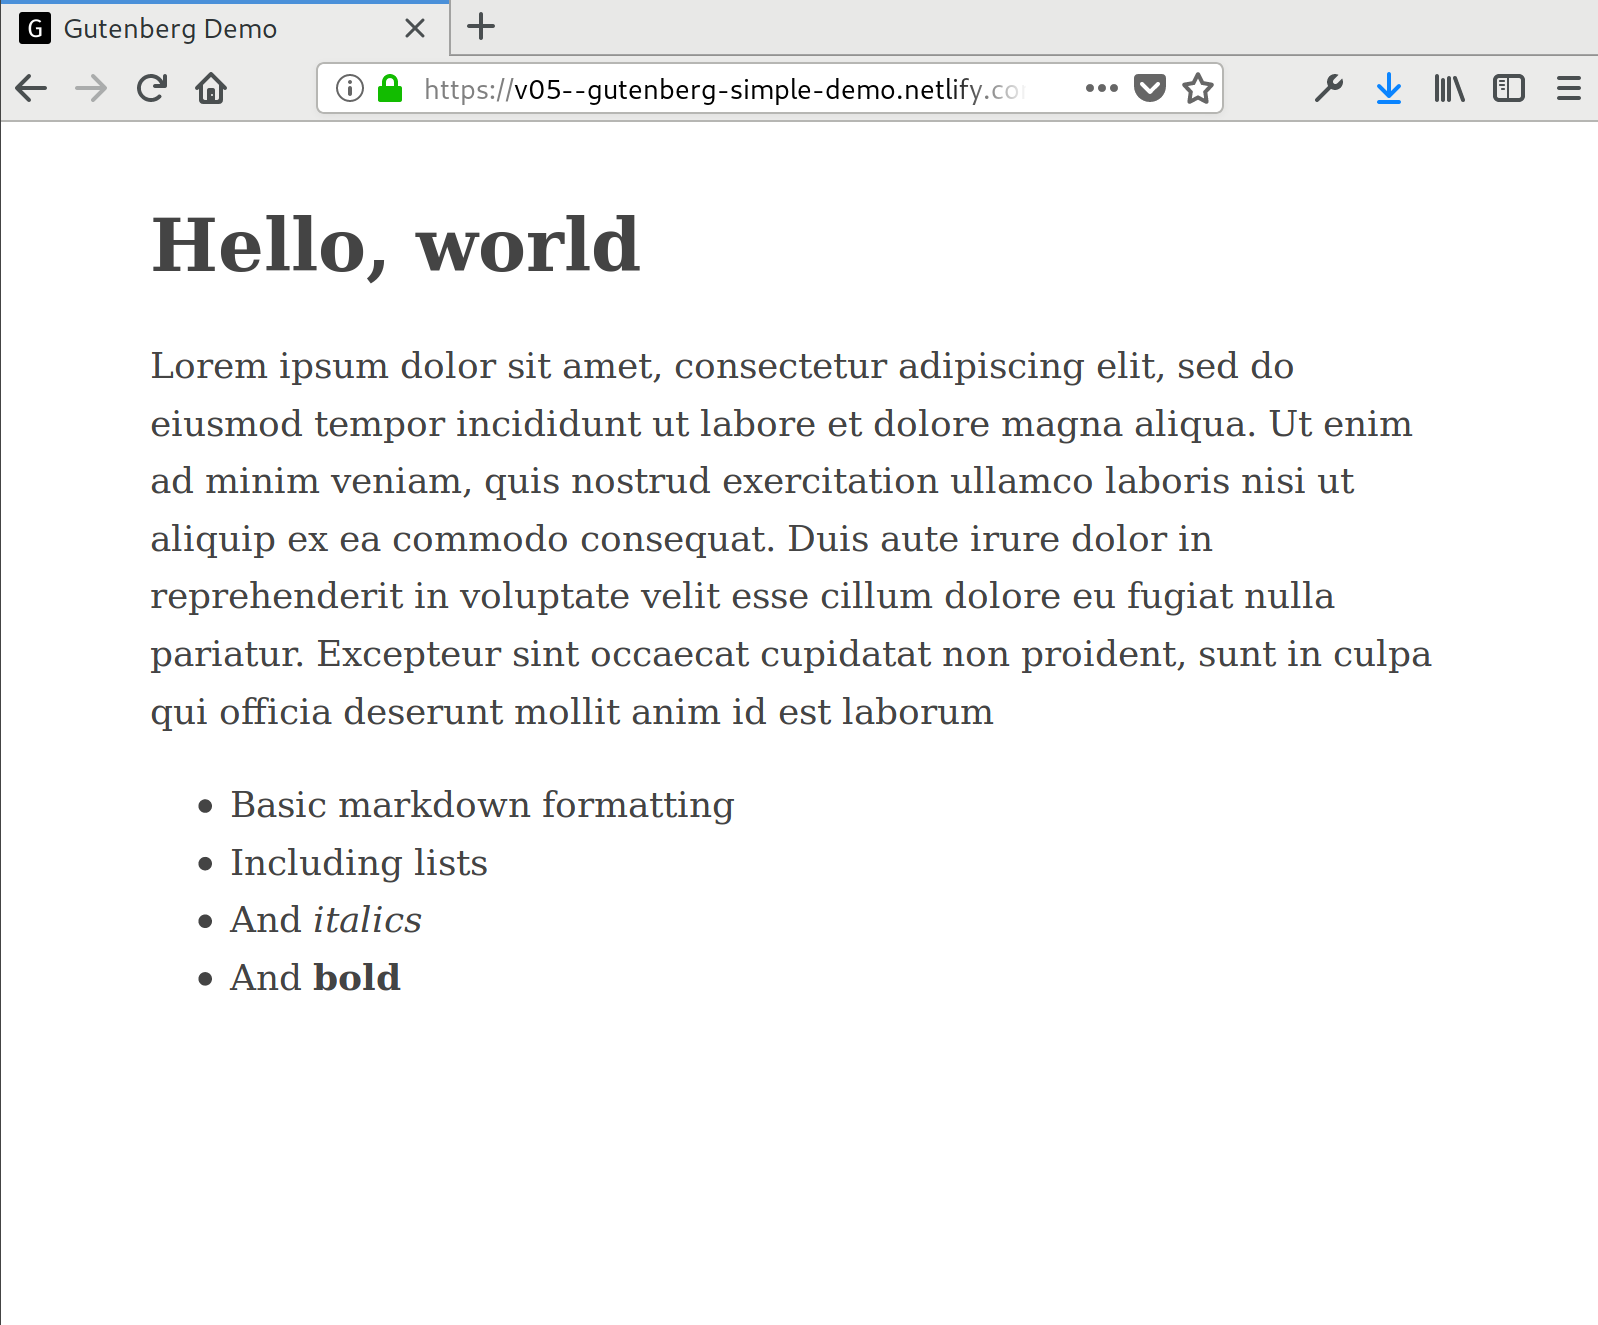
Finally, we should add a favicon, one of those little pictures that shows up in the tab bar. This isn't stictly required, but it sure helps our site look a bit better and it will let us see the process for uploading static files.
Since we don't have a favicon of our own, let's borrow Gutenberg's. I've
saved a copy of the file to the GitHub repository. Go
ahead and download it now, and save it to static/favicon.ico. Having
done that, what else do we need to do?
Nothing! Fire up your server, and you should see something like this:
[](https://v05--gutenberg-simple-demo.netlify.com/)How does this magic work? To understand this, let's talk a bit about how
Gutenberg generates your site. At a big-picture level, it takes all the files
in your content directory, processes them according to rules in your
templates directory (including by parsing Markdown files into HTML), and
then places the output files in your public directory. Next, it also places
all the files in the static directory directly into public—without
processing them at all.
Thus, when we put favicon.ico in the static directory, and then ran the
serve command, it was copied directly into the public directory and was
immediately available to our generated site.
Conclusion
So, that's everything you need to know to build a very basic site with Gutenberg. Once again, feel free to look at any of the live demo sites we built today (v1, v2, v3, v4, v5), or to check out the source repository, which has the code for each version in separate branches.
In the next part of this tutorial, we'll walk through how to add multiple pages to your site, including how to manage multiple templates in a way that's powerful and maintainable.